

The release of macOS 10.15 Catalina discontinues support for all 32-bit apps. This means the following sims games will no longer run:
- The Sims Medieval (EA)
- SimCity 2013 (EA)
- The original 32-bit Sims 3 (EA)
Aspyr have updated the following games to 64-bit in the Mac App Store so they will continue to work in Catalina:
- The Sims 2 Super Collection (Aspyr)
- SimCity 2013 (Aspyr)
- SimCity 4 (Aspyr)
EA have released a 64-bit native version of the Sims 3. You can find it in your Origin games library alongside the original version.
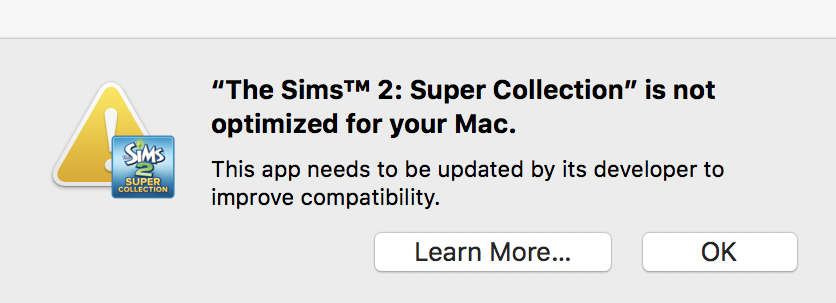
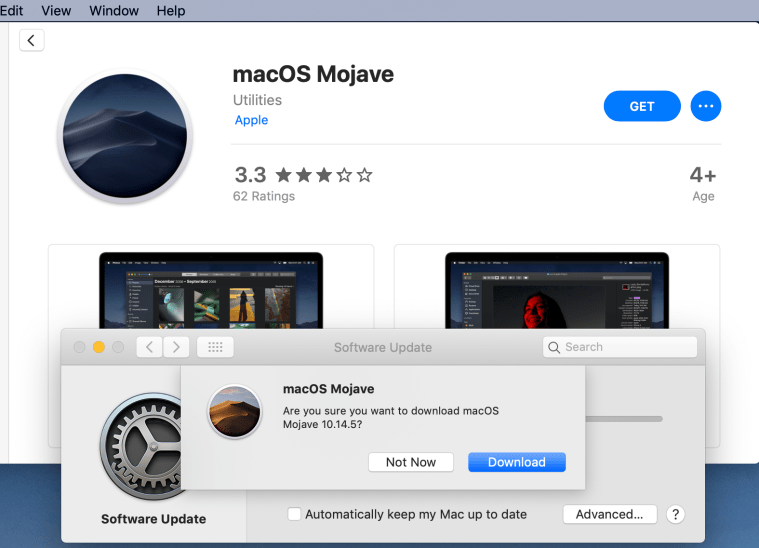
The following window may have been popping up on your Mac over the last year warning of this:
There are three possible ways to get round this issue and continue playing your legacy sims games in macOS, depending on your setup:
If your Mac is already running 10.14 Mojave or earlier:
Create a bootable external drive with macOS 10.14 Mojave or earlier installed. You could also create a partition on your Mac internal drive but make sure you do a solid backup before going down this route. I would recommend the external drive and leave your Mac HD well alone.
If your Mac originally shipped with macOS Mojave or earlier:
Use macOS Recovery to install the original version of the OS your Mac shipped with. This will completely wipe your Mac so make sure you do a backup.
If you purchase a Mac with 10.15 Catalina or later installed:
Install a VM (virtual machine) on your Mac and install macOS 10.14 Mojave or earlier in the VM. You will need to download and create an installer of Mojave (or earlier) to do this.
You could also consider Boot Camping your Mac and installing Windows. Any Origin games you own will be accessible to you as a PC download, if available, at no extra cost. Aspyr ports purchased through the Mac App Store will not be available.
Index:
– Checking which apps are 32-bit
– What you will need
– Instructions on installing macOS on an external drive
– Switching between the internal and external drives
– Virtual Machines
– Further links
Checking which apps are 32-bit:
To check which 32-bit apps you currently have installed click on the in the top menu bar then About This Mac > System Report. Under Software in the left hand side bar click on Applications, it will take a little while to populate the list. Once finished you should see a long list of applications installed on your Mac. Sort by the 64-bit column, all 32-bit Apps will have No in the field:

Activity Monitor (Applications > Utilities) also shows which apps are 32-bit when they are running. Make sure you are viewing the CPU tab, and sort by Kind:

To achieve the best performance I recommend creating a bootable external drive and will explain below, step by step, how to do this.
You will need:
- 1x external hard drive/USB stick. Make sure you use one with enough space for the operating system and all apps you are planning on installing and playing. The connection type depends on the Mac you are using. USB2/USB3 are the most common, USB-C/Thunderbolt 3 is currently (2019) the fastest. I am using a SanDisk 128GB Ultra Dual Drive USB Type-C but you may want more capacity if you are installing multiple games.
It wouldn’t hurt to back up your Mac before creating this bootable drive, in case you inadvertently wipe your Mac hard drive (yes, it can happen if you’re not paying attention).
Instructions:
Important note: You may want to open this page on another device or print it as your Mac will restart during this installation process. I refer to Mojave in this guide but it is applicable to whichever version of macOS prior to Catalina you are currently running.
-
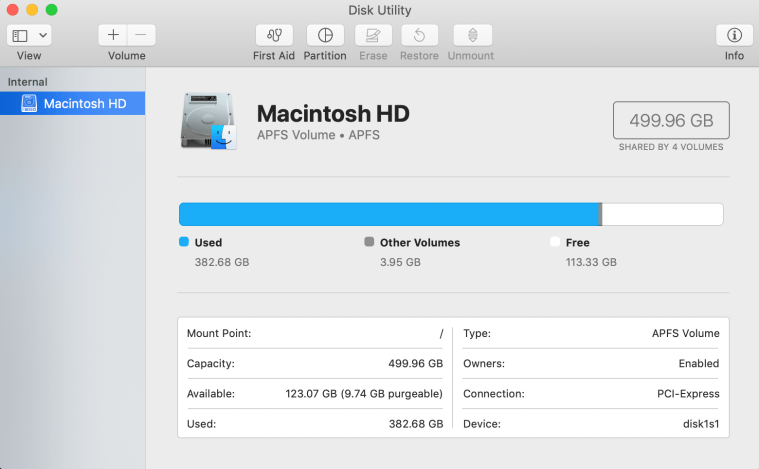
- Make sure you have no peripherals plugged into your Mac and then open Disk Utility (Applications > Utilities > Disk Utility) It should look like this with just your internal Macintosh HD showing, or similar if you have previously reformatted the disk or installed a replacement drive:
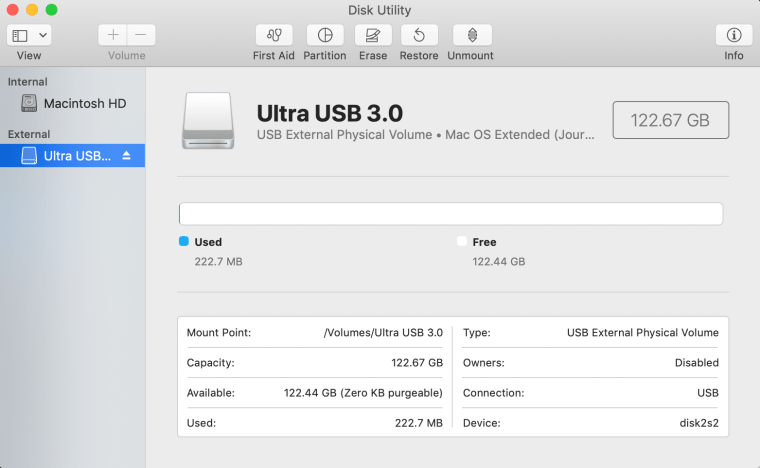
- Plug in the external drive that you will be installing Mojave onto. It will show up in the window and look something like this. Your drive may be formatted as FAT32, that’s absolutely fine for now:
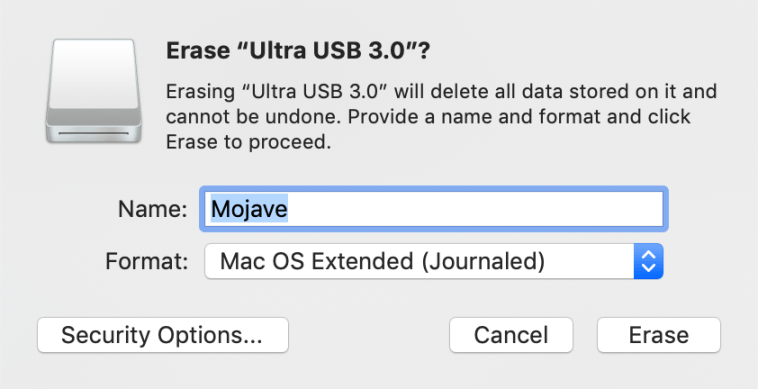
- We now need to erase this drive and turn it into a bootable drive so your Mac will install Mojave onto it. Make sure you have your external drive selected and not your internal Mac hard drive/SSD then click on Erase at the top of the window. In the window that pops up name the drive whatever you would like it to be and make sure to select Mac OS Extended (Journaled) as the Format, then click Erase:
- Your drive is now ready to install macOS onto so go ahead and quit Disk Utility. Next, open the App Store, make sure you are signed in and search for Mojave. Once you have found it click on the blue Get button. System Preferences will open and ask if you are sure you want to download Mojave, click Download:
- After it has finished downloading a window will pop up asking you to click continue to finish installing Mojave, go ahead and click it. Agree to the terms of the software licence agreement to get to the installation window (note – if you don’t want to install Mojave straight away just quit the installer, you can find it in your Applications folder when you’re ready to install).
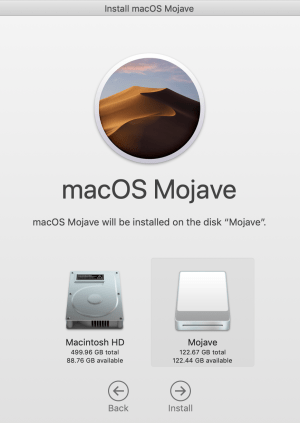
- The installation window should now look like this, where you choose the location of the drive to install Mojave onto. Click on the bootable drive you created then click on Install:
- Enter your password/fingerprint to allow the installation as an Administrator when prompted. It will now start the initial install. After a few seconds/minutes it will prompt you to restart your Mac. Hit the Restart button then sit back and wait, it’s going to take a while.
- After the installation has finished your Mac will have booted into the new drive. Follow the usual new set up procedure to suit your needs. Once completed you can install your 32-bit apps as usual.
- Make sure you have no peripherals plugged into your Mac and then open Disk Utility (Applications > Utilities > Disk Utility) It should look like this with just your internal Macintosh HD showing, or similar if you have previously reformatted the disk or installed a replacement drive:


Switching between the internal and external drives and selecting the default startup disk:
The install will have set your new bootable drive as the default startup disk. To change this back to your internal Macintosh HD open System Preferences > Startup Disk, click on the lock and enter your password to make changes, then click on the Macintosh HD to select it. Click the lock to prevent further changes.
To switch between your internal and external drives shut down your Mac, then hold down the Alt/Option key and turn it back on. Keep holding down the key until you see a screen showing the start up disks, you can use the tab key to select which drive to boot into then hit the Enter/Return key.
Virtual Machines
A virtual machine (VM) is software installed on your Mac that enables another operating system to be installed within it. There is no need to restart your Mac when using a VM as it runs within macOS. It is an easy and convenient way to run previous versions of macOS, Windows and Linux. However processor, memory, and graphics performance are hampered due to the increased load on the computer and the VM using its own drivers. There are various VM apps available, the two most popular ones are Parallels and VMware.
Further links:
– http://osxdaily.com/2018/10/21/download-macos-high-sierra-from-mojave/
– https://www.macworld.co.uk/how-to/mac-software/how-install-old-mac-os-x-versions-3679956/
– https://www.macworld.co.uk/how-to/mac-software/download-old-os-x-3629363/
– https://www.parallels.com/blogs/older-versions-mac-os-x-with-macos-sierra/
– https://www.aspyr.com
