EA have finally killed off Origin. All Mac users now require EA App in order to launch their games. EA App requires macOS 10.15 Catalina or above therefore if you are playing, or will be hoping to play, The Sims 4 or the 64-bit version of The Sims 3, you must make sure your Mac is running Catalina or subsequent versions of macOS.
Apple released Catalina in 2019 and can be run on all Metal supported Macs. For a full list of supported machines see Apple’s support article.
The nostalgia is immense and Jerry Martin’s music is still as good 25 years later. But only for Windows users.
25 years ago Maxis released the original Sims game and it was superb. Silly, quirky, simple, and lots and lots of fun. EA are celebrating this by re-releasing Sims 1 and Sims 2 through EA App, either separately or in a “Birthday Bundle” where you get a couple of Sims 4 Kits thrown in too. But only for Windows, not for macOS. Not really surprising though, The Sims 1 and The Sims 2 (minus a few packs) were originally released by Aspyr Media, not EA, probably through some kind of licensing deal. The Sims 2 Super Collection is still available through the Mac App Store and runs on Intel and Apple silicon Macs but Aspyr never made a digital version of Sims 1 available unfortunately.
Both The Sims 1 and The Sims 2 were originally written for PowerPC equipped Macs and required installation via disc. If you want to play The Sims 1, or The Sims 2 with all Packs available through EA App, on a Mac there are a few options available depending on your set up:
Install Windows through Boot Camp. This is the most stable way to run Windows on a Mac but is only available for Intel machines.
Use a virtual machine such as Parallels. Available on all Macs but can have limitations. Make sure to check specs such as Windows versions and specific Mac compatibility before committing.
Use a cloud based computer gaming system. Should be fully compatible but can be pricey. A good example is Shadow PC.
Using specific software to translate Windows API into a macOS compatible format such as Crossover. Not guaranteed to work with Sims 1 and EA App.
You can check which model Mac you have by clicking on the Apple logo in the menu bar then About This Mac. Apple curate a list of Apple silicon Macs here.
Apple silicon Macs (current “M” series Macs with ARM chips) – 2020 models onwards
This is the least compatible machine unfortunately. It isn’t possible to Boot Camp the silicon Macs and virtual machines are a bit hit or miss. The only guaranteed way to play Sims 1 would be to use a cloud based computer gaming system.
It is currently possible to get the Steam version (but not the EA App version) of Sims 1 installed on a silicon Mac using Whisky. Instructions in this video:
Intel Macs – 2005 to 2020 models
If your Mac has an i3, i5, i7, or i9 CPU (processor) it is an Intel equipped Mac. You can install Windows via Boot Camp on these Macs and it doesn’t cost anything. Boot Camp assistant is already installed in Applications > Utilities, all you have to do is download and install a Windows 10 ISO. Full instructions from start to finish are available in the Boot Camp Assistant User Guide on Apple’s website.
I have a couple of Intel Macs still alive and kicking. The 2017 15″ MacBook Pro with AMD Radeon 560 GPU is Boot Camped with Windows 10 and, after much trial and error and encountering the game failing to launch through EA App, is now happily running the Sims 1. This is how I managed to get it to run:
Used Boot Camp assistant to create a partition and installed Windows.
Installed all available Apple Boot Camp Support software updates in Windows – just search for Apple in the search bar in the Windows task bar at the bottom of the desktop and it should pop up.
I could not have fixed the game failing to launch issue without help and instruction from my fellow Hero+, Puzzlezaddict (she’s a Mac user but also knows Windows stuff). Also HUGE thanks to ErmacsForceKin for posting the MS VC++ instructions in the ongoing thread on the EA Forums. which has fixed the game for countless users.
If you’re having issues with trying any of the above join my Mac Sims Discord Support Server for help, click below:
EA are shutting down Origin on April 17th 2025. This means that if you want to carry on playing your EA games, whether you purchased them, redeemed gifted codes, or claimed free titles, you have to use EA App which means you MUST be running macOS 10.15 Catalina or later. If you can’t/won’t update your macOS to Catalina you won’t be able to play.
Who does this affect?
All Mac users running the following currently compatible operating systems:
macOS 10.11 El Capitan
macOS 10.12 Sierra
macOS 10.13 High Sierra
macOS 10.14 Mojave
By extension this means that if you want to carry on playing The Sims 3 and The Sims 4 you have to upgrade to Catalina as EA App will be required to authenticate entitlement to the game in your EA account.
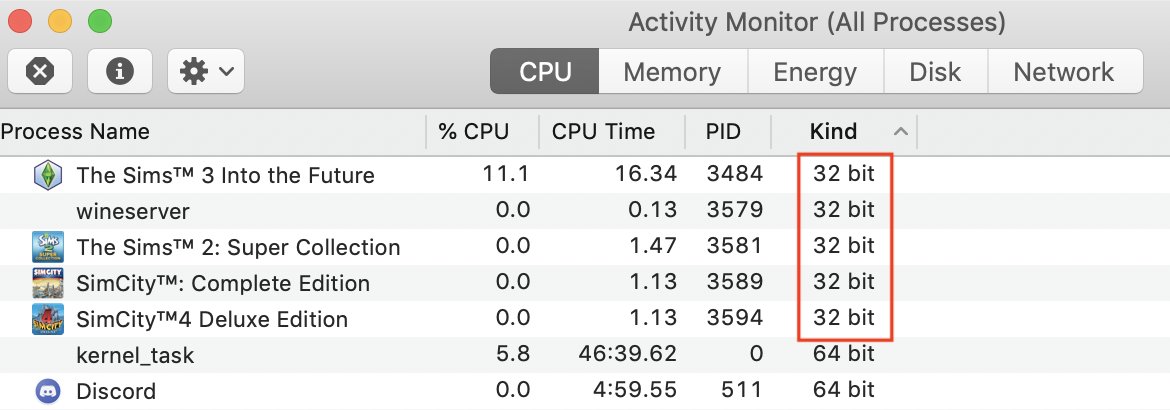
Upgrading to Catalina will mean that your Mac will no longer be able to run 32-bit applications as Mojave was the last macOS to support this. It is therefore important to check if any of the software you currently run, and rely on, in pre-Catalina versions of macOS are 32-bit. You can do this by launching your installed apps and opening Activity Monitor (Applications > Utilities > Activity Monitor) to check:
(note – this is an old screenshot from Activity Monitor and not indicative of the current versions of Sims 2, Sims 3 and SimCity/4 which are now 64-bit through EA or Aspyr)
Catalina will run on all Metal compatible Macs up to Macs released with subsequent versions of macOS, i.e. 2012 – 2019 models:
What if I need to still run 32-bit apps or want to stay on a pre-Catalina OS but also want to play my EA games?
You have a few options available:
Partition your internal hard drive:
use Disk Utility to partition the drive and install Catalina on the new partition. Make sure you allow enough space on the partition to include Catalina, around 12.5GB, EA App, around 1.5GB, and the games you want to play. As an example – the Sims 4 base game is currently around 24.5GB. All Packs and Kits to date amount to around 46.5GB. You would therefore need to allocate at least 85GB to the Catalina partition and this is not accounting for future DLC releases and any other games, plus spare space. 100GB would be the minimum partition allocation.
Install Catalina on a bootable external drive. Apple are making this harder to do in current and future versions of macOS but you should still be ok with pre-Catalina versions of macOS.
Install Windows in a Boot Camp partition and play in Windows instead of macOS. This is only an option if your Mac is an Intel machine and not Apple silicon (M-series ARM Macs) but if you are running pre-Catalina macOS your Mac will be an Intel machine as Apple silicon was released in 2020 and Catalina was released in 2019.
If you have any questions or need any further help upgrading to Catalina or creating a partition on your Mac the best place to ask is in my Discord server – https://discord.gg/EB9hZBDx34